Thursday, November 18, 2010

Quick and Easy Spaghetti Sauce Soup!

I think all mothers have those days when they just look at what is in the cupboards and have no idea what to make. Maybe it is laziness, maybe it's just a lack of creativity, either way the kids are hungry and you are no closer to making a meal.
Today's recipe is one for those days. Very little prep, easy ingredients, and wonderful taste in less than 20 minutes! It's one that I used to make a ton, but haven't made in a while. Tonight was one of those night's though, so soup it was!

Spaghetti Sauce Soup

3 tablespoons Olive oil

2 Carrots, peeled and chopped

1 Small onion, chopped

1 clove Garlic, minced

1 Large jar Marinara sauce

2 cans Vegetable broth

1 can Cannellini beans (or whatever beans you have on hand!), drained and rinsed

1/2 teaspoon Red pepper flakes

1/2 cup Pastina pasta (or any small pasta)

1/2 teaspoon Salt

1/2 teaspoon Freshly ground black pepper

1. Warm the olive oil in a large soup pot over medium-high heat. Add the carrots, onion, and garlic and saute until soft, about 2 minutes.

2.Add the jar of marinara sauce, vegetable broth, beans, red pepper flakes, pasta, salt and pepper. Simmer for 10 minutes. Ladle into bowls and serve.

Yup, it's that easy! And it makes such a yummy soup that you will be amazed.

Photobucket

Wednesday, November 17, 2010

Naan Pizza, Two Ways!

A few weeks ago a company called Tandoor Chef was having a contest to come up with a Naan pizza. Naan is an Indian flat bread, similar to a pita (not the kind with the pocket, but the flat ones). They can be found at any Indian Grocer, whole foods, and on occasion I have even seen them at Walmart. They are great served with many Indian dishes, but this Naan pizza thing wasn't something I was sure about. I decided I would give it a try anyway.

I sent Dominic off to find a new Indian grocer, since the one we usually frequent had closed, and he came home bearing a package of 10 frozen naan and two blocks of yummy paneer. I was so excited to try making an Indian version of pizza! I had picked an Indian recipe I love and had kind of deconstructed it so that just the sauce was in the recipe, and had the other ingredients set to be toppings. It was an interesting idea, but I was still skeptical of what the results would be.
I chopped, grated, stirred, and assembled. I threw them in the oven for 15 minutes and what should come out but one of the most delicious personal pizzas in the entire world (if I do say so myself!). They were like eating a little piece of Indian heaven. Yumm! The whole family loved them, even baby Jack!

With that such a hit I was excited to try making a traditional pizza on the naan. We still had six naan in the freezer, so one night I asked Ryan what he wanted and he said PIZZA!! He was so excited I decided I would gather the ingredients and let him assemble the little pizzas himself. I let him choose a jarred sauce from the cupboard, and four veggies from the fridge. I chopped the veggies and placed them on a plate for him to assemble the pizzas!
He had a blast spreading the sauce on the pizzas and then placing some of each of the veggies on them, but his favorite was sprinkling the cheese on top of it all! It was so much fun! I wish I had had a camera to capture it!

So, now that you've heard how much fun we've had who is ready for some new recipes? Here goes nothing!

Chili Paneer Pizza (serves 4)

For the Sauce:
2-3 Tbs Tomato paste
2 tsp Chopped garlic
1 Tbs Diced Green chiles
1 tsp onion powder
1 tsp Garam Masala
1 tsp ground ginger paste
2 tsps soy sauce
1/4-1/2 cup vegetable broth

For the pizza:
4 frozen Naan Bread
1 8 oz Block Paneer Cheese, grated
1 half a green bell pepper diced
1 half a red bell pepper diced

1. Pre-heat over to 350. For sauce combine all ingredients except vegetable broth in small bowl, stir. Add vegetable broth until desired consistency for your pizza sauce.
2 Spread about 2-3 tablespoons of sauce on each naan, divide bell peppers between the four pizzas, top with the paneer cheese.
3. Place naan on lined cookie sheet (only two will fit, so you need to cookie sheets, of to do it in two batches.). Bake in the over for 15 minutes, or until the paneer starts to turn a little golden.
Enjoy!

Ryan's Special Pizza (serves 4)

1/2 cup of Ragu Sun-dried tomato and sweet basil pasta sauce (or your favorite pasta sauce!)
1/2 cup sliced mushrooms
1/2 cup baby spinach leaves
1 Small roma tomato, diced
1/2 red bell pepper, diced
About a cup of Mozzarella Cheese
4 Naan Bread

1. Pre-heat oven to 350. Spread 2-3 tablespoons of sauce over each naan bread. Divide veggie toppings evenly between pizzas, top with mozzarella cheese.
2. Place on lined cookie sheet (only two will fit on each sheet, so make sure you have two, or are prepared to do it in two batches). Bake for 15 minutes, or until the cheese is bubbly and slightly browned.

Now wasn't that easy! I think Naan pizzas may become a go to quick meal in our house! One of the greatest part of this is that you can freeze these! Just wrap each pizza in plastic wrap and then place them in a large ziploc! When ready to eat them let them thaw on the counter while the oven pre-heats and bake as normal!

Wow! I had a lot to say today! Hope you enjoyed this! If you have some other fun ideas for pizzas please comment below!
Photobucket

Monday, November 15, 2010

Great Find: GrocerySmarts.com

Dom and I had discussed earlier this month getting the paper so that we could get the coupons and the Thanksgiving ads. We thought that we could easily recoup the cost of the paper with one good deal in the thanksgiving ads, and that the coupons would help save some money so we could have a better Christmas.
Well I signed up for the paper, and while talking to the man who signed me up I mentioned the coupons and he gave me a website to check out: Grocerysmarts.com. He said that the website would help me save even more than just using the coupons, so I looked it up, and lo and behold I was hooked!

When you arrive at the site there is a drop-down menu where you choose you state, then you are directed to your state's page. From there you choose your local grocery store (we shop at smith's, so that's what I will show you) and it lists that weeks ad, the price before and after the discount, applicable coupons, and the price with the discount and coupon. An example is below (sorry it is blurry, it was the best I could do!):
Our Smith's happens to be having a really good sale right now, as shown by all the red stars in the left hand column, and because of the sale and some of the coupons there are a few items I can get totally free! How awesome is that!
If the coupon is online it gives the link to where to print it, and if it is a mailer coupon it tells you the date it was mailed out and in which mailer! So simple!
I went through the list and figured out I could get two tooth brushes (which are always needed), two packages of cough drops, three cans of cream of mushroom soup, some quick cooking pasta, and two 2 liters of 7-up for a total of *Drum Roll Please* .79!
Yup, you heard me right, all that stuff for less than a dollar! I could hardly believe it!
Anyway, this was so great that I had to share it with you guys. It happens to be a great sale week at my local store, so this may not be a great indicator, but I am willing to give it a shot!
If you live elsewhere could you put in you things and let me know if you've got great deals in your area too?
Photobucket

Friday, November 5, 2010

Let's Give Me Something to Blog About

Some days I just get up and don't feel like doing anything. Lately I have been hit by a string of flu's, colds, and viruses and this has really turned me into an unproductive heap.

My house is an eternal mess due to my two little tornadoes, my blog is not updated because my head is mush, the dishes are piling up, and the laundry... I won't even go there! It feels like there is just too much to do, and no way to do it all, so I just don't do any of it some days. Yes, I know, avoidance is not going to make it better, but the lack of motivation is winning out.

My blog seems to be the hardest part of all of this. I really want to blog, but I feel like I have nothing to say, or that I am not saying the right things to get people to keep reading. It's hard. I want to be interesting and funny and heartwarming, but I'm not sure how to get there.

So here it is, the million dollar question: What do you want to see on this blog?

Help me get a feel for where I might go next, because I am just stuck in a "my camera is broken and my blog has no pictures, so I don't want to post" rut.

I'm also toying with the idea of adding some food related and kid-friendly crafts projects every now and then. I am a crafty person (though my mom is even more so, maybe it comes with age?) and I think it would be enjoyable to throw in some fun ideas for incorporating crafts with your cooking, and having kid-friendly crafts available for kids to do while you cook.

I don't know, just thinking that maybe if I added another dimension to my blog it might help me come up with more regular posts and make things more interesting around here! What do you think?

This is your chance to sound off and tell me what is working, what's not, what you want more of, anything you want to say! I need some motivation and inspiration. GO!
Photobucket

Tuesday, November 2, 2010

I love the Smell of Curries: Curried Red Lentils

I've decided that having a theme for the week helps me get going and actually post on my blog, even when life is a little crazy, so this week we are taking a trip to India and Asia.
There is little I love more than walking into a place that smells of curry. Don't get me wrong, I love other foods but by far Indian food would come out on top. There is something so warm and reassuring about the spices used in Indian curries that makes me crave it when it starts to get cold. The fragrant spices speak to me of warm exotic places.
I've been craving Indian food for weeks now, but our sweet little "Shop and Go" closed down sometime when I wasn't looking and has left me in a lurch to find all my favorite Indian food staples like Paneer, and Naan.
I searched for a quick Indian curry that used things easily found at the local grocery store, and with a little tweaking I have a super yummy, quick lentil curry that even my one year old devours! You should be able to find all the ingredients at the grocery store nearest you if you don't already have them in your cupboard.

Curried Red Lentils

2 cups red lentils
1 large onion, diced
1 tablespoon vegetable oil
2 tablespoons curry paste
1 tablespoon curry powder
1 teaspoon ground turmeric
1 teaspoon ground cumin
1 teaspoon chili powder
1 teaspoon ground coriander
1 teaspoon salt
1 teaspoon minced garlic
1 teaspoon ginger root, minced
1 (14.25 ounce) can diced tomatoes with juice
1 cup frozen green peas
1/4 cup chopped fresh cilantro

1. Wash the lentils in cold water until the water runs clear (this is very important or the lentils will get "scummy" and believe me you don't want that!), put the lentils in a pot with enough water to cover and simmer covered until lentils tender (about 10 minutes) adding more water if necessary.
2. While the lentils are cooking: In a large skillet or saucepan, caramelize the onions in vegetable oil.
3. While the onions are cooking, combine the curry paste, curry powder, turmeric, cumin, chili powder, coriander, salt, garlic, and ginger in a mixing bowl. Mix well.
4. When the onions are cooked, add the curry mixture to the onions and cook over a high heat stirring constantly for 1 to 2 minutes.
5. Stir in the diced tomatoes and peas and reduce heat, allow the curry base to simmer until the lentils are ready.
6. When the lentils are tender drain them briefly (they should have absorbed most of the water but you don't want the curry to be too sloppy). Mix the curry base into the lentils, garnish with cilantro and serve immediately.

This makes a ton, about eight main dish servings, and goes together very quickly. It's a great way to wow a crowd, and an excellent as leftovers! Serve with Naan and rice for a great meal!
Photobucket

Thursday, October 28, 2010

Halloween Is Almost Here: Gougere Ghosts

I am busy cleaning the house in preparation not only for a party, but a weekend house guest! It has been a busy day, and the little professional mess makers we employ are in full swing, which makes for one grumpy mommy. After realizing that keeping up with them by myself today was just not going to happen I sat down and looked at my "Recipes to Try" and got busy in the kitchen. Nothing like baking a brownie truffle pie to get you feeling happier!
Anyway, while I was looking through the recipes I found one of the recipes we are going to make for Saturdays 4th Annual D&D Halloween Party. I wasn't in the mood to post what I had planned on posting today, so I decided I would share this recipe with you instead! This recipe comes from Kitchen Daily and sounded so yummy, fun, and easy! Perfect for your next Halloween party!


Ghost Gougeres
  • 1 cup water
  • 1 stick unsalted butter, cut up (1/2 cup butter = 1 stick)
  • 1/2 teaspoon salt
  • 1 cup all-purpose flour
  • 4 large eggs
  • 1 cup grated Gruyere cheese (4 oz)
  • black sesame seeds (for eyes)


  • 1.Preheat oven to 400 F. Line two large baking sheets with parchment paper.

    2. In a heavy saucepan bring water, butter, and salt to a boil, stirring to help melt butter. Add flour all at once and beat vigorously with a wooden spoon until mixture forms a dough. Continue beating over medium-low heat until dough is smooth and pulls away from sides and bottom of pan, about 2 minutes.

    3. Remove pan from heat and let cool 2 minutes. Beat in eggs one at a time with the wooden spoon or an electric mixer, beating after each addition until batter is smooth again. Beat in the grated cheese.

    4. Transfer dough to a pastry bag fitted with a 1/2-inch plain tube. Pipe "ghosts" onto lined baking sheet so that they are about 1-inch wide at base and 3 inches long, tapering to a point at top (they will be about 1/2-inch thick).

    5. Press two black sesame seed eyes onto each ghost and bake in upper and lower thirds of oven, switching positions halfway through, until golden and crisp, about 25 minutes.

    Read more: http://www.kitchendaily.com/recipe/gougere-ghosts-149776#ixzz13h4qvFg7

    I can't wait for October to be over! This has been such a crazy busy month that I have hardly had time to sit down and do something I REALLY want to do.
    Anyway, I guess I am off to the kitchen to sweep and mop!
    Photobucket

    Tuesday, October 26, 2010

    Halloween Continues: Mummy Face Pizzas!


    Last year I was in charge if dinner on Halloween and I decided to make everything Halloween themed. We had monster toes, breadstick bones, bug juice, and some Mummy pizzas! My oldest thought it was so much fun! He especially liked the pizzas though, because he is a pizza junkie! They were so easy to make that I thought they would be a great addition to this weeks Halloween recipes! These little guys can be made ahead and frozen for fright night, but they are so easy I recommend just making them!

    Mummy Face Pizzas
    1- 6 count package of English Muffins
    Your Favorite Pizza Sauce
    12 Sticks mozerella string cheese
    1 Can sliced olives

    1. Heat oven to 400ºF.

    2. Spread english muffin halves with sauce. Pull cheese into thin strips; place in random criss-crosses on tops of bagels to resemble mummy bandages. Trim ends with kitchen shears. Add olives for the eyes.

    3. Place on baking sheet. Bake 10 min. or until muffins are crisp and cheese is melted.


    These would be great to have a child help with, they will love pulling the string cheese apart!

    Photobucket

    Monday, October 25, 2010

    Halloween: Edible Jack-o-Lanterns

    This weekend is Halloween! Halloween is a big deal in my family. My little sister was born on Halloween, and my mom has always gone all out for Halloween. She does so many crafty things and makes all kinds of fun meals. Because she is so into Halloween I decided I would do a whole week of fun Halloween recipes!
    This first one comes from the blog of one of my Husband's cousins. I stole it, with permission, it's always fun to see what other people are doing! The idea came to her as she was flipping through a Halloween magazine: stuffed orange peppers with Spaghetti and cut them up like Jack-O-lanterns. Here is her take on the idea!

    7 orange peppers
    1 cup brown rice
    1 package mushrooms, sliced
    1/2 onion, diced
    1 tbsp butter
    1 tbsp soy sauce
    1 tbsp Parmesan cheese
    2 tbsp shredded mozzarella cheese
    Salt and pepper to taste

    1. Preheat Oven to 350 degrees. Cook rice according to directions


    2. Hollow out and cut peppers like jack-o-lanterns, make sure you reserve the tops! You can't make a proper jack-o-lantern without a stem.
    2. In a sauce pan, melt the butter. Add onion and cook until translucent. Add the soy sauce and mushrooms, cook until tender.
    3. Turn off heat. Add Parmesan cheese and mozzarella cheese.
    4. Mix vegetable and cheese mixture with cooked rice, stuff into peppers.
    5. Place on baking sheet, cook at 350 degrees for ten to fifteen minutes, until peppers are tender.

    Don't these sound fantastic! And they look so much fun! I imagine you could mix just about any veggie in with the rice mixture and it would be just as good! I'm thinking of trying these with some spinach added, as it is hard to get my kids to eat the green veggies unless they are mixed in with other yummy things!

    Photobucket

    Tuesday, October 19, 2010

    Beggars Purses- A creative Crepe Presentation

    I love to throw parties. Getting friends and family together and having good food, games, music, and conversation is one of the most wonderful things! I'm always looking for a reason to throw a party, be it a birthday, just a game night, or even a party to celebrate cheese (our third annual cheese party is coming up in march!).
    When it comes to parties I am all about the food. You can't have a great party if people are hungry! I love to make a least one dish I make look especially cool, it tend to jump start conversation and make for a pretty presentation.
    Enter the beggars purse.
    The hardest thing about these is roasting the peppers, but they turn out so yummy and beautiful it is worth the time! I borrowed the steps on roasting the peppers and the pictures that accompany them from Allrecipes.com


    Beggars Purse

    One recipe Chive Crepe Batter
    1 cup cherry or grape tomatoes, chopped
    3.5 oz Goat cheese
    4 Bell peppers
    3 tablespoons olive oil
    One long fresh chive or green onion for each crepe

    1. Pre-heat your oven's broiler.
    Coat each pepper evenly with oil. A pastry brush is a useful tool to use when coating the peppers, but fingers will work in a pinch if a pastry brush is not on hand. Make sure to coat inside the folds of each pepper.

    2. Arrange the peppers on a baking sheet and place the baking sheet on the highest rack in your oven.

    3. Keep a watchful eye on the peppers to ensure that they do not become too scorched. When dark splotches begin to appear on the peppers, remove the baking sheet from the oven and carefully turn each pepper over.

    4. The peppers will be very hot, so use tongs or some other kitchen utensil to do this. Once all of the peppers are turned, return the sheet to the oven.

    5. When the tops of the peppers begin to darken again, remove them from the oven and place them into a bowl large enough to accommodate all of the peppers. Cover the bowl. It is important that the peppers are in an air-tight container for this step of the process in order for them to be steamed. The trapped hot peppers generate the steam necessary to loosen their skins.

    6. Once the peppers are cool enough to handle (probably about 15 to 20 minutes), pull the stems out of each pepper.

    7. Hold one end of the pepper down on a flat surface and gently peel the skin off of each pepper. The skin should slide off fairly easily.

    8. Lift each pepper up and hold it with one hand, while using your other hand to squeeze down the pepper's length. The bulk of the seeds and pulp should drop out the bottom when this motion is completed.

    9. With the backside of the knife, slit open the side of each pepper and spread them out (ribbed side up) on your work surface. With the dull side of your knife, scrape off any of the ribs or membrane that remains in the pepper.

    10. Dice up the roasted peppers and return to the bowl, add the chopped tomatoes and goat cheese, stir well

    11. Place about two tablespoons of the pepper mixture in the center of a crepe, gather up the sides to make a "purse"(see picture), and tie together with a chive or green onion. Repeat for each crepe.
    Photobucket

    Friday, October 15, 2010

    Sorry For the Hiatus- Shake & Bake Tomatoes

    October is a crazy month for my family! So many birthdays and our anniversary, and Halloween events! And then you add in midterms, and fall breaks, and it just gets more busy! I am so sorry I haven't posted anything recently, I have been meaning to! I will try to be better! Please forgive me!

    Today I am going to share one of my Husband's (the Recovering Meat-a-holic Dad) recipes. This recipe came about by accident when we did not have any breadcrumbs around, but had some shake and bake mix (which is vegetarian)! I hope you enjoy it as much as we do! we might have to make this tonight with some of the tomatoes and parsley we harvested at the University Sill Garden yesterday!

    Shake & Bake Tomatoes

    2 Tablespoons butter
    1 Clove garlic, chopped
    1/2 cup of shake and bake (we use the chicken shake and bake usually, don't know how the others are)
    1/4 cup loosely packed fresh parsley
    1/4 cup of mexican cheese blend
    1/4 teaspoon salt
    1/4 teaspoon black pepper
    4-5 roma tomatoes, halved

    Directions:
    1. Arrange oven rack in upper third of oven, preheat to 425F
    2. Line broiling pan or cookie sheet with foil
    3. In a large skillet melt butter over medium heat, add garlic and cook, stirring until fragrant (1 minute or so)
    4. Remove skillet from heat, stir in shake and bake, parsley, cheese, and seasonings until well mixed.
    5. place tomato halves cut side up on prepared cookie sheet and top with the shake and bake mixture.
    6. Roast 15 minutes or until tomatoes are heated through and topping is slightly browned.

    These make an excellent appetiser for parties as they are pretty quick to make! The time we have made them they have been very much enjoyed by everyone!

    On another note: I have been thinking about starting a vegetarian group through Meet-up for Salt Lake City. There are over 100 people who are waiting for such a group, and I think it would be a great way to spread the word about my site a little more. The only problem is that it costs money to be the host of the group. It's about $12 a month. I would love to do it, but I am not sure I can really afford that right now. If you are a vegetarian in the Salt Lake area would you please comment and let me know if you would be willing to come to events if I started a vegetarian meet-up.

    Photobucket

    Saturday, October 2, 2010

    World Vegetarian Day Party

    Last night was our world vegetarian day celebration! We had so much yummy food! Not as many people showed up as we would have liked, but we had some good times and enjoyed the food. Everyone had a different favorite it seemed! Here are just a few pictures from last night. I'll be giving out the recipes for all the food over the next week, so be on the lookout if you see something you particularly like!

    Below are the wonderfully delicious shake and bake tomatoes that my husband made. They are his own recipe, and were one of our guests, Jeremy's, favorite.
    These are our Roasted Pepper Beggar's Purses. We used the Chive Crepes recipe and filled them with a super yummy filling! Details on the filling will be coming later this week!

    Next we have our yummy couscous cups. I got the idea from the blog Cooking With My Kid but we made them mini and changed a few ingredients. They were fabulous!
    One of the night's favorites though were the mixed berry crepes, I am excited to share this recipe later! The crepes, filling, and berries can all be in your freezer for a quick and beautiful dessert that can be made for unexpected guests. They will think you were expecting them the whole time.

    I hope you all enjoyed seeing some "Food Porn" and I hope you will come back to the blog soon to find more delicious recipes!
    Photobucket

    Friday, October 1, 2010

    I love Parties

    Today is a crazy busy day for our house! Tonight is our big shindig celebrating my upcoming website and World Vegetarian day. I've got most of the cooking done, thanks to wonderful freezable recipes, but there is still a lot of prep work and finishing work to do! Everything from the freezer is thawing in the fridge, in preparation for baking tonight. I'm trying to hunt down a mini cupcake pan, and clean, and make a last minute grocery list of things to pick up. I still need some sort of dessert and beverage...
    So what does this all mean? No real post today, but tomorrow there will be a great post, and LOTS of pictures!
    If you live in Salt Lake we would love for you to drop by tonight! We will have lots of food for everyone to try, nd everyone is welcome!
    Photobucket

    Thursday, September 30, 2010

    Delicious CousCous: Great as a salad starter or Crepe filling

    The other night I made this filling to go in some crepes we had, it didn't take too long and was so good that I HAD to share it. The great thing about couscous is that once prepared it can be frozen! Make a double batch and freeze some for another night! We stuffed the Chive Crepes with this and then topped it with Tomato Goat Cheese Cream Sauce. What a fabulous dinner!


    Parmesan Couscous with Mushrooms and Sun-dried Tomatoes


    1 Cup of plain couscous
    1 -1/4 cup vegetable broth
    1/4 cup dry packed sun-dried tomatoes, chopped
    1/4 cup cremini mushrooms, chopped
    1-2 tbsp toasted pine nuts
    1 tsp olive oil
    1/4 onion, diced
    3-5 cloves garlic
    1/4 cup shredded parmesan cheese
    1 tbsp Italian parsley, chopped

    1. Bring vegetable broth to a boil. In a large, lidded bowl combine the couscous and sun-dried tomatoes. Remove broth from heat and pour over couscous mixture. Cover. Let sit for five minutes.
    2. In dry skillet, add pine nuts and cook until lightly golden brown, about 2 minutes (stirring frequently). Remove from heat. In same skillet, add oil, once hot, add onions, garlic and mushrooms, cook until onions are slightly caramelized & tender.
    3. Once the couscous is done, stir in the onions mixture, pine nuts, cheese and parsley. Enjoy!
    Photobucket

    Wednesday, September 29, 2010

    National Vegetarian Month


    I know not all of my followers are Vegetarian, and so I thought you guys might like to know about this great opportunity to possibly win some money!
    October is national Vegetarian awareness month, and October 1st is world vegetarian day. In honor of this worldvegetarianday.org is offering up a chance to win some prizes for anyone who is willing to forgo meat for a short time. If you do it for just one day you could win $250! A Week is $500! And if you go the entire month without meat you could win $1,000!
    To enter all you have to do is go Here and make an online pledge to be meat free for however long you choose!
    It's so easy to do, and with the help of The Vegetarian Mom you can certainly make it through!

    Also, for those of you who do not know our family is hosting a dinner party in honor of World Vegetarian Day this Friday! If you are in the area and enjoy eating please come join us! If you need detail on our address please contact me on the facebook page!
    Photobucket

    Monday, September 27, 2010

    Crepes: The versatile food *UPDATED WITH PICTURES*

    Sorry it's been a while since my last post. The whole family came down with a flu or something! We are still recovering, but hopefully we will soon be back on track.
    Anyway, I love crepes. There is something about the lovely lacy bubbles that form on the thin pancake like surface that just make me want to gobble them up. Whenever I make them they go pretty fast, even the one year old will eat at least two of them!
    My favorite thing about crepes is that they are very versatile. The best dessert I ever had was a dark chocolate crepe with raspberry filling and an orange liquer sauce, but my favorite way to eat crepes is with savory fillings. Below are two recipes for crepe batter, one sweet, one savory. Fill them with whatever you think sounds good! Make a double batch and freeze the leftovers between sheets of waxed paper in a freezer bag for a quick meal some other night.

    Chive crepes


    3/4 to 1 cup milk, divided
    3 eggs
    1/2 teaspoon salt
    1 cup flour
    1/4 cup ( 1/2 stick) butter, melted
    2 tablespoons minced chives
    Cooking Spray

    1. In a blender, pour in three-quarters cup milk, one-half cup water and the eggs, and pulse two or three times until smooth. Add the salt and flour. Blend the batter until smooth. With the blender running, add the melted butter. The batter should be as thick as heavy cream. If necessary, add up to one-quarter cup more milk to get the desired thickness. Strain the batter into a bowl, stir in the chives, cover and refrigerate at least 1 hour.

    2. Heat an 8- to 9-inch nonstick skillet or crepe pan over medium-high heat until a few drops of water skitter when sprinkled on the surface. lightly spray the pan with a thin coat of cooking spray.

    3. Stir the batter to redistribute the chives and pour one-fourth cup into the center of the skillet. Swirl the skillet quickly so that the batter completely covers the bottom. Pour the excess batter back into the bowl, trimming with a spatula any ragged edges before they set. Return the skillet to the heat and cook until the surface of the crepe firms and dries, about 1 minute. Using a small spatula or table knife, gently lift the edges of the crepe. Grab the edges with your fingertips and quickly flip over the crepe; the cooked side should be lightly colored. Cook the uncooked side just until the crepe slides free in the pan, about 30 seconds. Remove the crepe to a plate.

    4. Repeat until all of the batter is used, adding more butter as needed. Layer the crepes with a piece of wax paper between each to prevent sticking.

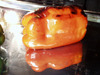
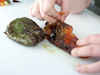
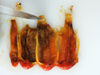
    Serving Suggestions: Fill with your favorite cheese, vegetables, or beans. Our family favorite is Tomatoes and peas with cheddar cheese. Also try filling with a grain, such as rice or couscous. Below is a picture of one idea, these crepes were filled with a pepper goat-cheese filling and tied with a fresh chive. The recipe for the filling will be coming later.


    Sweet Crepes
    3/4 cup all-purpose flour
    1 teaspoons salt
    1 cup milk
    2 eggs
    2 tablespoons sugar
    1 tablespoon melted butter
    1/2 teaspoon vanilla extract
    Cooking Spray

    1.Put the flour and salt and in a large mixing bowl. Gradually whisk in the milk. Whisk in the eggs, 1 at a time, and then whisk in the sugar, melted butter, and vanilla. Cover and let rest in the refrigerator for about 1 hour.

    2.Heat an 8-inch nonstick skillet over medium-high heat. Spray with a thin coat of cooking spray

    3.Add 1/4 cup of the batter and move your wrist in a circular pattern to coat the pan with thin even layer of batter. Cook for about 1 minute or until the first side browns lightly, then flip and cook 45 seconds to 1 minute longer. Remove to a plate and repeat with remaining batter.

    Fill with jam, honey, berries, sugar, chocolate hazelnut spread, peanut butter, bananas, or my personal favorite, ice cream!
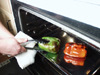
    Below is an easy preparation, perfect for last minute guests, all of the ingredients are freezer staples! The recipe will be coming later!

    I hope you enjoy trying these recipes, be creative and make them your own! Try topping savory crepes with a homemade sour cream sauce, super yummy!
    Photobucket

    Thursday, September 23, 2010

    Hamburgerless Helper to the Rescue: Quick Meals

    One of my Facebook followers asked for some ideas on how to prepare hamburger helper without the hamburger. He noticed that the ingredients included in the whole grain products did not contain any non-vegetarian ingredients and thought they would make a great meal, but that they needed something more.
    I decided to go and do some research and find some ideas for him. I've given two ideas for each of the four whole grain hamburger helpers; that's 8 meals! These make great lunches for the busy mom or student, and a quick dinner when you don't want to think too much! So skip the meat and enjoy!


    Whole Grain Hamburger Helper: Stroganoff
    Suggestion 1: A great alternative to beef stroganoff has always been mushrooms! Saute a half a pound of cremini or baby bella mushrooms and add them when you would the hamburger.
    Suggestion 2: Give it double the veggies! Use a can of prepared tomato basil soup instead of water (Progresso has a good one!) and add 2 cups frozen broccoli, thawed, when it's done cooking.


    Whole Grain Hamburger Helper: Cheeseburger Macaroni
    Suggestion 1: Add 1/2 cup of salsa and 1/2 cup of sour cream along with a can
    of drained black beans and 1/2 cup of corn and top with sliced olives for a yummy Mexican inspired pasta dish!
    Suggestion 2: Try adding 1 cup frozen peas and a 1/4 cup of sun-dried tomatoes,the dry packed kind are pretty cheap, and are great to have on hand,. Sprinkle with some parmesan cheese for some extra cheesiness!


    Whole Grain Chicken Helper: Lemon and Herb Chicken
    Suggestion 1: My absolute favorite thing with lemon is asparagus. Toss 2 cups steamed chopped asparagus with the prepared pasta. Skip the lemon glaze though... just trust me!
    Suggestion 2: Use Morning star Meal starter chicken strips in place of the chicken, toss in a cup of mixed veggies and chill for a wonderful pasta salad.


    Whole Grain Chicken Helper: Honey-Mustard Chicken
    Suggestion 1: Use tempeh cutlets in place of the chicken. Place lettuce and the helper along with some sour cream in a tortilla for a yummy wrap for on the go!
    Suggestion 2: Um... this one is baffling me... most likely because I don't really like mustard... anyone have any other suggestions? Write them in the comments!


    I hope these ideas have helped! If you have any more ideas for quick mix-ins or substitutions please leave them in the comments!
    Also, tomorrow we will be having a special quest post! Yup, The Recovering Meataholic Dad (aka, My Husband Dominic) has a recipe to share with you! So be on the lookout!
    Photobucket
    Publish Post

    Wednesday, September 22, 2010

    Vegetarian Times- Farfalle with Tomato- Goat cheese Cream Sauce

    When you look through the magazine section in your grocery store there are many magazines about cooking, and though good, they usually don't include many vegetarian recipes (one I once saw had an article on tofu... which included a recipe for tofu wrapped pork...). This can be frustrating sometimes when you have exhausted your vegetarian cookbooks.
    Enter Vegetarian Times.
    Vegetarian times magazine is the only all vegetarian cooking magazine I have been able to find in my many years as a vegetarian. Though some of it's recipes call for expensive ingredients it is a great resource. The recipe index also includes listings for Gluten free recipes, which can be important if you are ever entertaining someone with a gluten intolerance. It is a great magazine overall.
    This month's issue had several good articles, including one on using prepared canned soups in cooking. Last night's dinner was pulled from this article, and it was so good I thought I would share it with all of you! If you try it and like it I highly recommend you pick up a copy of Vegetarian Times for yourself!

    Farfalle with Tomato-Goat Cheese Cream Sauce

    12 oz Farfalle Pasta (bowties!)
    1 cup frozen petite peas
    2 Tbs Pine nuts
    1/2 Tbs olive oil
    3 cloves garlic, minced (1 Tbs)
    1 1/4 cups prepared creamy tomato soup
    1/4 cup half and half
    3 oz creamy goat cheese

    1. Cook pasta in large pot of boiling salted water according to package directions until al dente, adding peas during the last 3 minutes of cooking. Drain in colander and set aside. Quickly return empty pot to the same burner (with heat off) Wait a few seconds until the pot looks dry, then add pine nuts. Cook over medium heat one minute, or until frgrant and lightly toasted. Transfer nuts to plate.
    2. Add oil to pot and saute garlic over medium heat until just beginning to brown. Stir in soup, half-and-half, and bring to a brisk simmer over medium-high heat. Reduce heat to medium-low, and simmer gently 3 minutes, or until mixture is slightly reduced and begins to thicken. Add cheese and cook 2-3 minutes more, until cheese is completely melted into sauce, stirring occasionally. Season with salt and pepper if desired.
    3. Stir pasta, peas, and nuts into sauce in pot; toss well, and serve.

    I made a double batch of the sauce and froze it for a later dinner. We also added some sauteed mushrooms and sun-dried tomatoes to ours to give it a little more variety. It was delicious, especially with a little sprinkling of parmesan cheese.
    Photobucket

    Tuesday, September 21, 2010

    These are a few of my favortie things...

    I think everyone who cooks has a few staples in their kitchen that they just can't live without. Things that they use over and over and always replace when they run out. Growing up it was always parmesean cheese, the grated kind that comes in a can. I could not get enough of it, and I put it on EVERYTHING! Since then my tastes have evolved (though there is still always parmesean cheese in my fridge, it's now freshly grated), but there are still some things in my kitchen that I love and find myself using over and over. I thought I would compile a list of my top five condiments for the vegetarian kitchen and share it with you. This will be the first in a series of "favorites" posts. Hopefully you'll find some of your favorite things here too, but if not feel free to leave some comments with your favorite kitchen staples!


    1. Colgin's Liquid Smoke: This is an excellent staple to have around! I use it in sauces, marinades and soups a lot, and especially when converting a non-vegetarian recipe to something vegetarian. It's great to give that smoky flavor to a vegetarian split pea soup, or to add that "just out of the smoker" flavor to portabello mushroom burgers.


    2. Dynasty Thai Chili Garlic Paste: this is one of my new favorites! It has only been in my fridge a few months and it is already almost needing to be replaced! Used in a lot of Asian recipes, it is a great staple to spice up any recipe a bit more! Be careful though, a little goes a LONG way. Two teaspoons of this stuff gives you about the spiciness of a can of diced green chilies, so I use it when I don't have diced green chilies and don't want to run to the store.


    3. Sabra Roasted Red Pepper Hummus: Though this one is mostly consumed with bits of bread and crackers as a snack (because I cannot resist is red-peppery goodness) I have used it for a number of things. It is an excellent sandwich spread, and it does wonders to pasta sauces, adding both flavor and protein. Any hummus is good, but this particular brand is my favorite! So glad are local grocery store finally started carrying it!


    4. Spice World Minced Garlic: Okay, this one should go without saying... recipe after recipe uses garlic and sometimes you just don't want to go through the trouble of peeling and mincing one clove of garlic. I get the 24 oz size I think. I know it looks like a lot, but if you cook regularly you will use it up in no time! You do lose a little of the garlic flavor, so if you are making something where Garlic is the star flavor you'll want to get it fresh.


    5. Jack Daniels Original No. 7 Barbecue Sauce: This is the only barbecue sauce we ever have around the house, as the hubby is quite particular about his barbecue sauce. This is an essential for wonderful marinades in the summer, great as a sandwich spread, and delightful in soups! It is an essential ingredient in my favorite black bean soup!


    These are just a few of my favorite things! If you watch for them in my recipes you will see that they recur quite frequently! Remember to comment with some of you favorites. Who knows, they might be seen in a recipe later. ;)
    Photobucket